
Introduction
Imagine an experience where you ask your personal assistant to set up a meeting with your team, but your team is working on a big project and you don’t know at what time your team will be available for a meeting. No worries, your PA is super smart and quickly prepares a list of first 5 most suitable timings based on availability of all the attendees. Impressed, right? We will try to imitate the same experience by developing our own PA, a Teams bot.
Prerequisites
- An Azure subscription to create an Active Directory App and a Bot service.
- .NET Core SDK version 2.1.
- Understanding of Bot Framework, Dialogs and User authentication within a conversation.
- Microsoft Teams.
Getting started
Before we get our hands dirty with code, we need to register our bot in Azure. Follow the steps given in Bot Framework’s documentation for registration. Please note there that are two ways mentioned in this document to create an Active Directory app:
- Let Bot service create an app for you; or
- You can create it manually.
Either way, add the following permissions in the app:
- User.Read
- User.ReadBasic.All
- Calendars.Read.Shared
- Calendars.ReadWrite
- Mail.Send
Flow
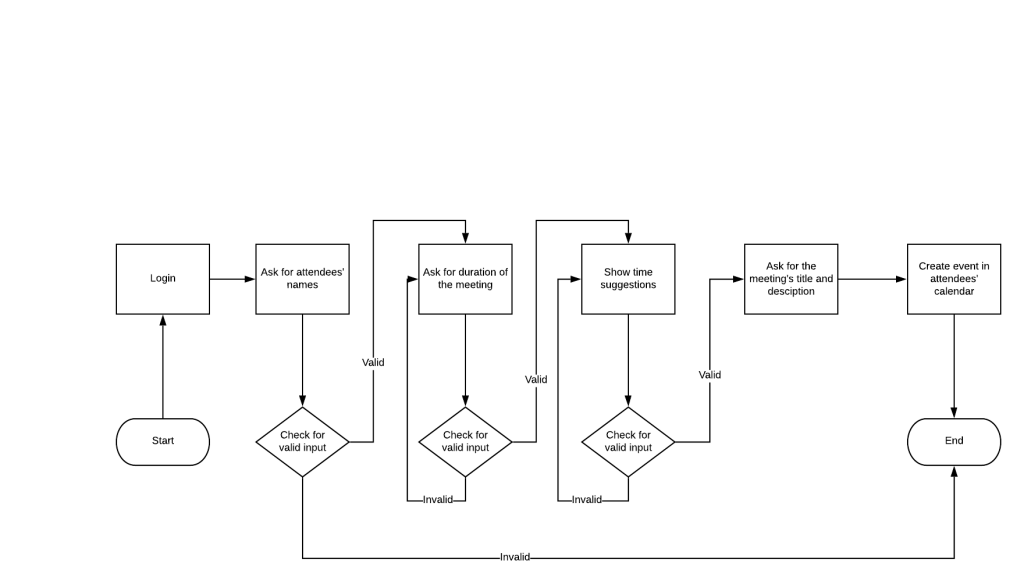
The first important thing is to define a flow or order which our bot will follow to interact with users. The flow chart below describes the flow which we will follow in this article.
Code
Microsoft’s Bot Framework team has made some amazing bot samples available on GitHub, which cover a lot of use cases. To get started with the code, clone BotBuilder samples repository. We will be building our bot on top of sample #46 (Teams Auth). Now open the Teams Auth sample code which we cloned earlier. Open 46. teams-auth project and under Dialogs folder open MainDialog.cs file. Replace the constructor with the one written below:
public MainDialog(IConfiguration configuration, ILogger<MainDialog> logger)
            : base(nameof(MainDialog), configuration["ConnectionName"])
        {
            Logger = logger;
            this.configuration = configuration;

            AddDialog(new OAuthPrompt(
                nameof(OAuthPrompt),
                new OAuthPromptSettings
                {
                    ConnectionName = ConnectionName,
                    Text = "Please Sign In",
                    Title = "Sign In",
                    Timeout = 300000, // User has 5 minutes to login (1000 * 60 * 5)
                }));

            AddDialog(new TextPrompt(nameof(TextPrompt)));
            AddDialog(new ConfirmPrompt(nameof(ConfirmPrompt)));
            AddDialog(new ChoicePrompt(nameof(ChoicePrompt)) { Style = ListStyle.HeroCard });
            AddDialog(new DateTimePrompt(nameof(DateTimePrompt)));
            AddDialog(new NumberPrompt<double>(nameof(NumberPrompt<double>), DurationPromptValidatorAsync));

            AddDialog(new WaterfallDialog(nameof(WaterfallDialog), new WaterfallStep[] //As this is a waterfall dialog, bot will interact with user in this order
            {
                GetTokenAsync, //Prompt user to sign in
                AskForAttendees, //Ask user for attendees
                GetTokenAsync, //Get token which will be used in next step to call Graph to get email of attendees and save attendees in turnState so that it can be used in next step
                AskForDuration, //Ask user for duration of the meeting
                GetTokenAsync, //Get token which will be used in next step to call Graph to get meeting times
                ShowMeetingTimeSuggestions, //Show meeting times
                AskForTitle, //Ask for title of the meeting
                AskForDescription, //Ask for description of the meeting
                GetTokenAsync, //Get token which will be used in next step to call Graph to send meeting invite and save description in turnState so that it can be used in next step
                SendMeetingInvite //Create event
            }));

            // The initial child Dialog to run.
            InitialDialogId = nameof(WaterfallDialog);

        }
In the constructor, we define Prompt Dialogs which will require user inputs, and Waterfall Dialog which defines steps to be executed in series. The order of waterfall steps will basically be the flow of our bot.
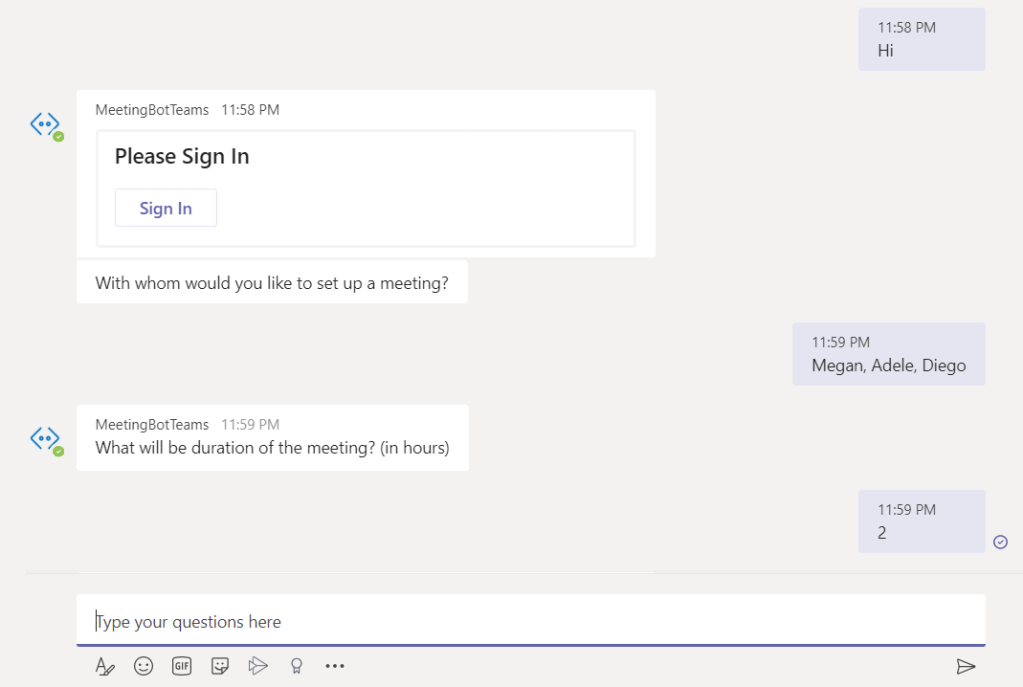
Bot framework provides an amazing way to let users sign in to our bot. OAuthPrompt dialog prompts user to sign in if haven’t done so already and retrieves token for the signed is user which can be used to call Graph. Add the following method below constructor:
  private async Task<DialogTurnResult> GetTokenAsync(WaterfallStepContext stepContext, CancellationToken cancellationToken)
        {
            if(stepContext.Result != null)
            {

                if (stepContext.Result.GetType().Equals(typeof(System.String)))
                {
                    stepContext.Context.TurnState.Add("data", (string)stepContext.Result); //acts as temporary intermediate storage for previous step's string input (attendees and description)
                }
                else if (stepContext.Result.GetType().Equals(typeof(System.Double)))
                {
                    stepContext.Context.TurnState.Add("data", ((double)stepContext.Result).ToString()); //acts as temporary intermediate storage for previous step's double input (double)
                }
            }

            return await stepContext.BeginDialogAsync(nameof(OAuthPrompt), null, cancellationToken); //OAuthPrompt prompts user to sign in if haven't done so already and retrieves token. If the user is already signed in, then it just retrieves the token
        }
This is a common method which we can be used to get token for any step which needs it. OAuthPrompt gives us token which can be used in next step. This method also takes care of scenarios where we both want token for the next step and need to send some data from the previous step to the next step. For example: if you want to send a value from step A to C, but you need to use step B to get graph token for step C. C’s stepContext will contain result of only B’s token, and not of A’s value. So we can use turnState in B to store A’s value.
Once authentication part is set, we are ready to jump right to the main flow. Add the following method below GetTokenAsync:
   private async Task<DialogTurnResult> AskForAttendees(WaterfallStepContext stepContext, CancellationToken cancellationToken)
        {

            var tokenResponse = (TokenResponse)stepContext.Result; // Get the token from the previous step.
            if (tokenResponse?.Token != null)
            {
                // Pull in the data from the Microsoft Graph.
                var client = new SimpleGraphClient(tokenResponse.Token);
                var me = await client.GetMeAsync();
                userEmail = me.UserPrincipalName;
                table = CreateTableAsync("botdata"); //creates table if does not exist already
                MeetingDetail meetingDetail = new MeetingDetail(stepContext.Context.Activity.Conversation.Id, userEmail);
                await InsertOrMergeEntityAsync(table, meetingDetail); //inserts user's email in table
                return await stepContext.PromptAsync(nameof(TextPrompt), new PromptOptions { Prompt = MessageFactory.Text("With whom would you like to set up a meeting?") }, cancellationToken);
            }

            await stepContext.Context.SendActivityAsync("Something went wrong. Please type anything to get started again.");
            return await stepContext.EndDialogAsync(cancellationToken: cancellationToken);
        }
In this method, we query graph to get details of the user, store it in a storage and prompt user to enter attendees. We use SimpleGraphClient class which is a graph helper to interact with graph APIs. Once we have graph client, we get user’s details. And then we prompt user to enter attendees of the meeting. As we are mentioning TextPrompt, the bot expects text input.
Every bot needs to maintain state of the conversation. For that, we use Azure Table storage. You can obviously use any other storage mechanism. CreateTableAsync creates new table, or returns table if a table with same name already exists. We need to store a model called MeetingDetails which inherits TableEntity of Table storage. While initializing MeetingDetails, we pass user’s email as partitionKey and coversation id as rowKey. This will store one record for each user’s conversation. InsertOrMergeEntityAsync inserts/updates a record in the table.
Next we check if the user has entered valid attendees and prompt the user for the duration of the meeting. Paste this code below AskForAttendees:
 private async Task<DialogTurnResult> AskForDuration(WaterfallStepContext stepContext, CancellationToken cancellationToken)
        {
            string result = (string)stepContext.Context.TurnState["data"]; //gets attendees' names

            var tokenResponse = (TokenResponse)stepContext.Result; //gets token
            if (tokenResponse?.Token != null)
            {
                var client = new SimpleGraphClient(tokenResponse.Token);
                string[] attendeeNames = string.Concat(result.Where(c => !char.IsWhiteSpace(c))).Split(","); //splits comma separated names of attendees

                List<string> attendeeTableStorage = new List<string>();
                foreach (string name in attendeeNames)
                {
                    List<string> attendeeEmails = await client.GetAttendeeEmailFromName(name); //gets email from attendee's name
                    if (attendeeEmails.Count > 1) //there can be multiple people having same first name, ask user to start again and enter email instead to be more specific
                    {

                        await stepContext.Context.SendActivityAsync("There are " + attendeeEmails.Count + " people whose name start with " + name + ". Please type hi to start again, and instead of first name, enter email to avoid ambiguity.");
                        return await stepContext.EndDialogAsync(cancellationToken: cancellationToken);


                    }
                    else if (attendeeEmails.Count == 1)  // attendee found
                    {
                        attendeeTableStorage.Add(attendeeEmails[0]);
                    }
                    else //attendee not found in organization
                    {
                        await stepContext.Context.SendActivityAsync("Attendee not found, please type anything to start again");
                        return await stepContext.EndDialogAsync(cancellationToken: cancellationToken);
                    }

                }

                var sb = new System.Text.StringBuilder();
                foreach (string email in attendeeTableStorage)
                {
                    sb.Append(email + ","); //converts emails to comma separated string to store in table
                }
                string finalString = sb.ToString().Remove(sb.Length - 1);
                if (result != null)
                {
                    MeetingDetail meetingDetail = new MeetingDetail(stepContext.Context.Activity.Conversation.Id, userEmail);
                    meetingDetail.Attendees = finalString;

                    await InsertOrMergeEntityAsync(table, meetingDetail); //inserts attendees' emails in table

                    return await stepContext.PromptAsync(nameof(NumberPrompt<double>), new PromptOptions { Prompt = MessageFactory.Text("What will be duration of the meeting? (in hours)"), RetryPrompt = MessageFactory.Text("Invalid value, please enter a proper value") }, cancellationToken);
                }
            }
            await stepContext.Context.SendActivityAsync("Something went wrong. Please type anything to get started again.");

            return await stepContext.EndDialogAsync(cancellationToken: cancellationToken);
        }
This method gets attendees from previous step (GetTokenAsync) from turnState. As we expect user to input multiple attendees’ names, we need to convert those names to a list of names.
We pass each name from this list to SimpleGrapClient’s GetAttendeeEmailFromName method, which returns a list of emails found against the name. If no emails are found, that means the attendee does not exist in the organization or name is incorrect. If more than one email is found, that means that there exist multiple people with same name. In that case, we ask user to be more specific, like enter full name or email. Then we store emails of all the attendees in our table as we will need that later.
Final part of this step is to prompt user to enter duration of the meeting. As we expect duration to be of double data-type (possible inputs format: 1, 2.5, 1.25 hours), we need to validate user’s input. We cannot allow user to enter text data.
For this, we use NumberPrompt<double>which validates user input. As you can see in the constructor that we have added this dialog with a validator called DurationPromptValidatorAsync, this method will check if the duration is less than 8 hours (or any other maximum limit). If the input is invalid, user will be prompted again for a valid input. Add the following method below AskForDuration:
  private Task<bool> DurationPromptValidatorAsync(PromptValidatorContext<double> promptContext, CancellationToken cancellationToken)
        {
            return Task.FromResult(promptContext.Recognized.Succeeded && promptContext.Recognized.Value > 0 && promptContext.Recognized.Value < 8);

        }
Now that we have attendees and duration, our bot is ready to give us time suggestions. Graph’s findMeetingTimes is going to help us out with this. We need to pass a list of attendees and duration to this API, and it will return time slots when all the attendees will be available. Cool, right?
private async Task<DialogTurnResult> ShowMeetingTimeSuggestions(WaterfallStepContext stepContext, CancellationToken cancellationToken)
{
double duration= Convert.ToDouble(stepContext.Context.TurnState["data"]);
var tokenResponse = (TokenResponse)stepContext.Result;
if (tokenResponse?.Token != null)
{
// Pull in the data from the Microsoft Graph.
var client = new SimpleGraphClient(tokenResponse.Token);
MeetingDetail meetingDetail = await RetrieveMeetingDetailsAsync(table, userEmail, stepContext.Context.Activity.Conversation.Id); //retrives data from table
timeSuggestions = await client.FindMeetingTimes(meetingDetail.Attendees, duration); //returns meeting times
if (timeSuggestions.Count == 0)
{
await stepContext.Context.SendActivityAsync("No appropriate meeting slot found. Please try again by typing 'hi' and change date this time");
return await stepContext.EndDialogAsync(cancellationToken: cancellationToken);
}
var cardOptions = new List<Choice>();
for (int i = 0; i < timeSuggestions.Count; i++)
{
cardOptions.Add(new Choice() { Value = timeSuggestions[i].Start.DateTime + " - " + timeSuggestions[i].End.DateTime }); //creates list of meeting time choices
}
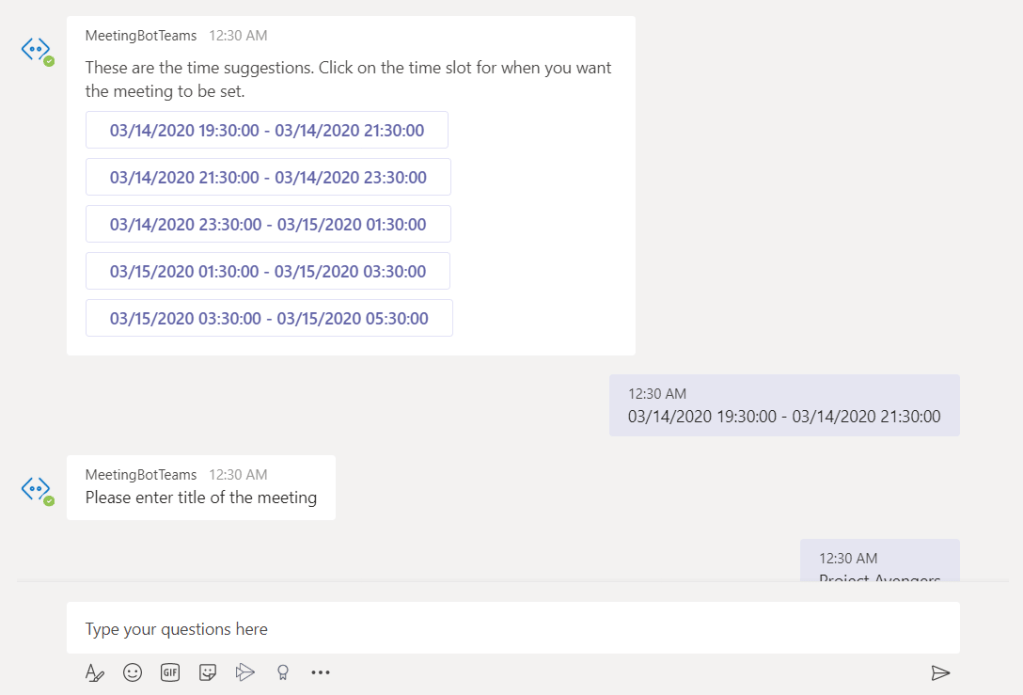
return await stepContext.PromptAsync(nameof(ChoicePrompt), new PromptOptions
{
Prompt = MessageFactory.Text("These are the time suggestions. Click on the time slot for when you would the meeting to be set."),
RetryPrompt = MessageFactory.Text("Sorry, Please the valid choice"),
Choices = cardOptions,
Style = ListStyle.HeroCard, //displays choices as buttons
}, cancellationToken);
}
await stepContext.Context.SendActivityAsync("Something went wrong. Please type anything to get started again.");
return await stepContext.EndDialogAsync(cancellationToken: cancellationToken);
}
You can get times of your preferred time zone by adding preferred time zone in request header of Graph. You can check out SimpleGraphClient class’ code in my GitHub repo of this project whose link is mentioned at the bottom of this page.
After receiving results from findMeetingTimes, we need to display those slots to the user in the form of buttons. For that we use ChoicePrompt with list styles as HeroCard. This will show time slot choices to the user in form of button cards.
At this stage, you can ask user for meeting’s title and description, or set default values.
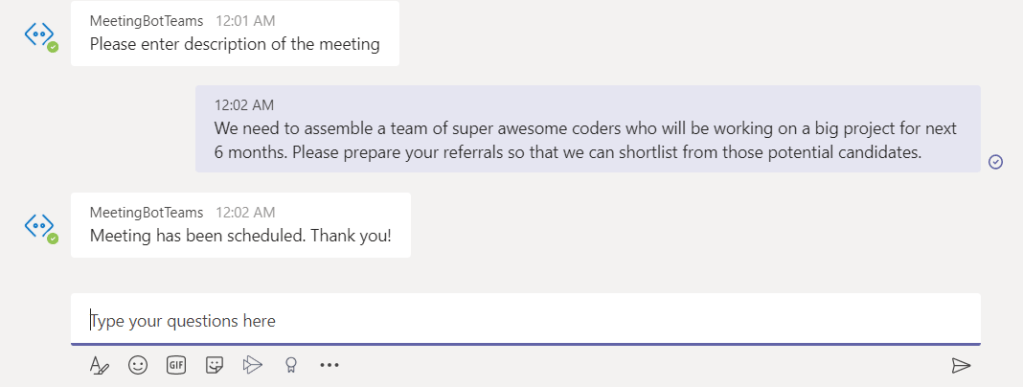
Now comes the final step. We need to create event in calendar, which will also send meeting invites to attendees. Graph’s Create Event API takes care of that for us. To use this API, we need to pass meeting details like time slot, attendees, duration etc.
 private async Task<DialogTurnResult> SendMeetingInvite(WaterfallStepContext stepContext, CancellationToken cancellationToken)
        {
            string description = (string)stepContext.Context.TurnState["data"];
            var tokenResponse = (TokenResponse)stepContext.Result;
            if (tokenResponse?.Token != null)
            {
                var client = new SimpleGraphClient(tokenResponse.Token);
                MeetingDetail meetingDetail = await RetrieveMeetingDetailsAsync(table, userEmail, stepContext.Context.Activity.Conversation.Id); //retrieves current meeting details

                await client.SendMeetingInviteAsync(timeSuggestions[Int32.Parse(meetingDetail.TimeSlotChoice)], meetingDetail.Attendees, meetingDetail.Title, description); //creates event

                await stepContext.Context.SendActivityAsync("Meeting has been scheduled. Thank you!");


            }
            else
                await stepContext.Context.SendActivityAsync("Something went wrong. Please type anything to get started again.");
            return await stepContext.EndDialogAsync(cancellationToken: cancellationToken);
        }
And DONE!
Deploying the bot to Teams
- Upload an app package to Microsoft Teams. Make sure that you add “token.botframework.com” as valid domain in manifest.json of TeamsAppManifest folder.
- Add teams channel. Make sure that you update messaging endpoint of your bot if you have been using ngrok to test locally and now want to host the bot on cloud.
Bot in action
You can find this project on my GitHub. Happy coding!

Leave a comment